
Overview
In the previous article, I laid out the requirements and plan for my Kubernetes cluster build.
This article will outline the process I followed to bootstrap a brand new Kubernetes cluster from scratch, and subsequently add additional nodes to the cluster.
As my systems are all running vanilla Debian, the package manager commands will all be using apt.
WARNING:

I am bad and use root for work like this on personal systems instead of using sudo, so you will need to `su -` to root before starting. For the record, I know this is bad practice and I only do this on personal servers. You should 100% use sudo on the commands below where appropriate instead.
Prep The Node
This step is required for every node you add to the cluster.
Start off by updating apt package lists
apt update
Kubernetes requires an underlying container runtime. There are
multiple options but for simplicity, I have decided to go with containerd. To install containerd, you need to perform the following steps.
# Add prerequisites
apt install -y apt-transport-https ca-certificates curl gpg

# Add Docker's official GPG key:
install -m 0755 -d /etc/apt/keyrings
curl -fsSL https://download.docker.com/linux/debian/gpg -o /etc/apt/keyrings/docker.asc
chmod a+r /etc/apt/keyrings/docker.asc

# Add the docker repository to apt sources
echo \
  "deb [arch=$(dpkg --print-architecture) signed-by=/etc/apt/keyrings/docker.asc] " \
  "https://download.docker.com/linux/debian " \
  "$(. /etc/os-release && echo "$VERSION_CODENAME") stable" | \
  tee /etc/apt/sources.list.d/docker.list > /dev/null
apt update
apt install -y containerd.io

# configure containerd
containerd config default > /etc/containerd/config.toml
sed -i 's/SystemdCgroup = false/SystemdCgroup = true/g' /etc/containerd/config.toml
systemctl restart containerd
Now to install kubeadm, kubelet, and kubectl.
kubeadm is used for bootstrapping new clusters and adding nodes to an existing cluster, kubelet is the actual daemon that runs on the server to run containers, and kubectl is used to interact with a running kube cluster.
# add kubernetes keyring and apt sources
curl -fsSLo /etc/apt/keyrings/kubernetes.gpg https://packages.cloud.google.com/apt/doc/apt-key.gpg
curl -fsSL https://pkgs.k8s.io/core:/stable:/v1.30/deb/Release.key | gpg --dearmor -o /etc/apt/keyrings/kubernetes-apt-keyring.gpg
echo 'deb [signed-by=/etc/apt/keyrings/kubernetes-apt-keyring.gpg] https://pkgs.k8s.io/core:/stable:/v1.30/deb/ /' | \
  tee /etc/apt/sources.list.d/kubernetes.list

# install packages
apt update
apt install -y kubelet kubeadm kubectl

# kubernetes should always be manually updated, so I tell apt not to update these packages any time others are updated
apt-mark hold kubelet kubeadm kubectl

# enable the kubelet
systemctl enable --now kubelet
Now, kubernetes requires a bit more system-level configuration before it can be brought online as a node in a cluster. First off, kubernetes does not support running on systems that have swap enabled. There is an in depth discussion that explains why Kubernetes will not run with a system that is swap enabled. Feel free to read about it yourself, its outside of scope for this article.
# disable all swap immediately
swapoff -a
It is important that you also remove any swap that is configured to in /etc/fstab. I recommend editing the file manually and commenting out any lines that reference swap partitions for safety.
Kube also needs a couple kernel modules to be enabled and sysctls configured to work properly, so lets make that happen too.
# load the required modules into the currently running kernel
modprobe br_netfilter overlay

# configure the modules to load at boot
cat <<EOF | tee /etc/modules-load.d/k8s.conf
overlay
br_netfilter
EOF

# define the sysctls needed for kube to work correctly
cat <<EOF | tee /etc/sysctl.d/k8s.conf
net.bridge.bridge-nf-call-iptables  = 1
net.bridge.bridge-nf-call-ip6tables = 1
net.ipv4.ip_forward                 = 1
EOF

# activate the above sysctls in the running system
sysctl -p /etc/sysctl.d/k8s.conf
This next step is semi-optional, but required to install the kube dashboard and a bunch of other stuff as well, so definitely handy to have.
# install helm
curl https://baltocdn.com/helm/signing.asc | gpg --dearmor | tee /usr/share/keyrings/helm.gpg > /dev/null
echo "deb [arch=$(dpkg --print-architecture) " \
  "signed-by=/usr/share/keyrings/helm.gpg] " \
  "https://baltocdn.com/helm/stable/debian/ all main" | \
  tee /etc/apt/sources.list.d/helm-stable-debian.list
apt update
apt install helm
You can technically skip this step, but I still like to manually pull the kube images before spinning up the node.
kubeadm config images pull
Shortcuts
If you have already prepped OPNsense, likely because you are following this section again, you can easily skip ahead to the following sections:
Prepare OPNsense
Now, this is where things start to diverage a little from the typical bare-metal kube deploy, and something I had to figure out on my own. It isn’t very difficult, but hopefully documenting this step will help someone else (or myself in the future, most likely). In order to have multiple control planes, which is definitely what I want in my own lab, you must provide a load-balanced DNS address for the kubernetes API. I’ve read that you can do a simple roud-robin DNS, but I want the cluster to be as robust as possible. I decided to go with HA Proxy provided by OPNsense.
NOTE:

OPNsense requires that the system be running the latest version in order to install plugins, so be prepared to update the router and reboot the box.
- Login to OPNsense router
- Navigate to
System > Firmware > Status, clickCheck for Updates.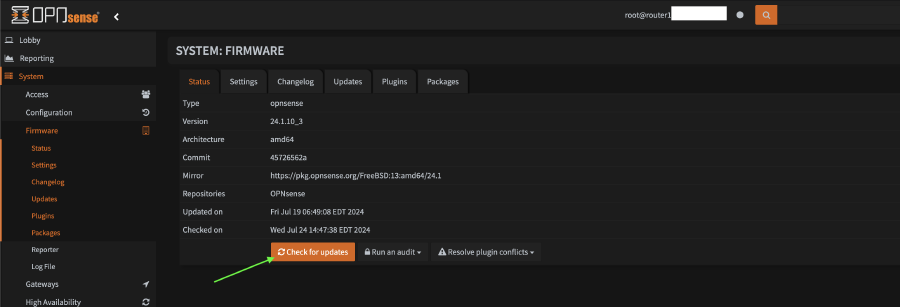
- Follow the directions for updating the system
- After updating, log back into the system
- Navigate to
System > Firmware > Plugins - Scroll down and find
os-haproxyand click the+sign to install it - Refresh the page in the browser and navigate to
Services > HAProxy > Settings - Click on the
Real Serversand click the+at the bottom of the list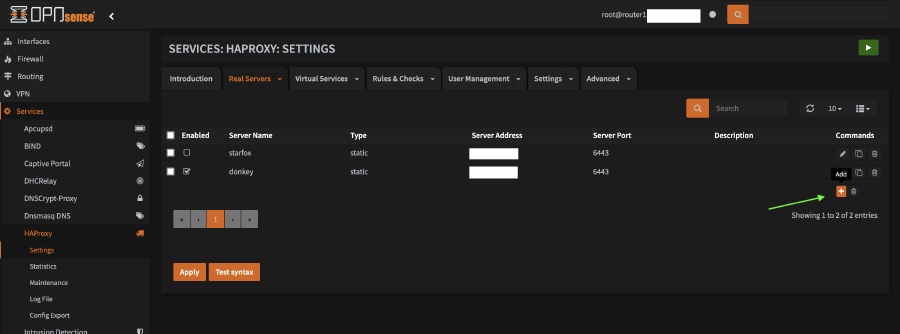
- Configure the first server you are going to use to bootstrap

- Enter the name
- Set
typetostatic - Add the IP or FQDN of the server
- Set port to
6443 - Click
Save
- Click on the
Virtual Servicestab drop down, then clickBackend Poolsand click on the+in the list - Configure the backend pool
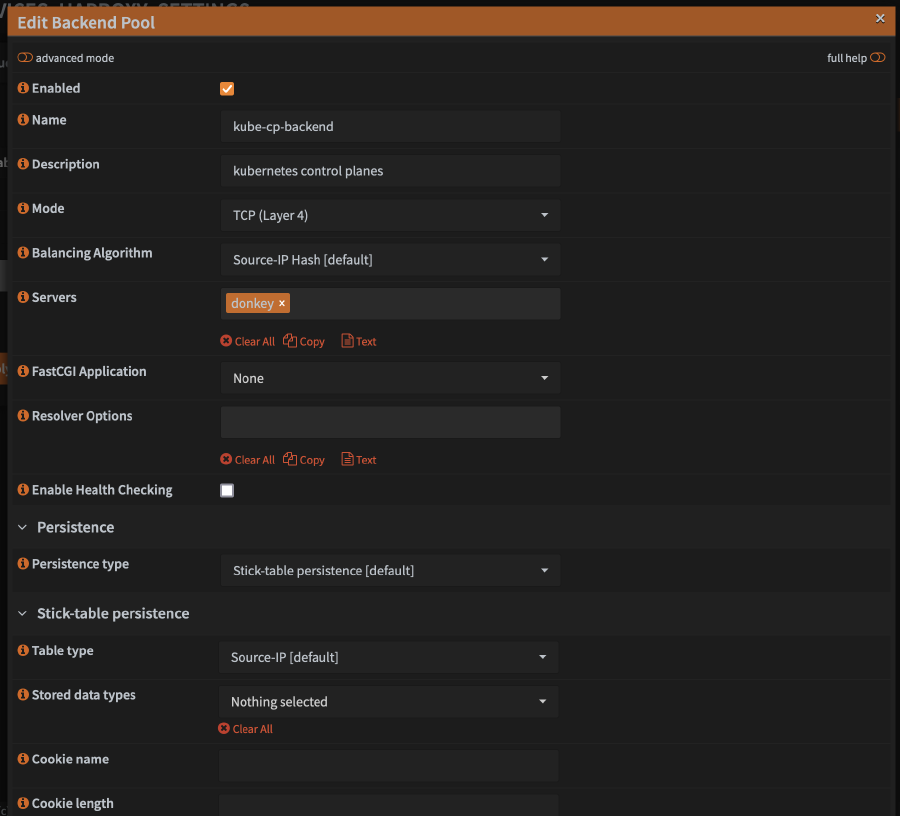
- For
Name, enterkube-cp-backend(or any name you want) - Optionally set
Descriptiontokubernetes control planes(or something similiar, its only for display) - Set
ModetoTCP (Layer 4) - Add your server under
Servers - Check
Enable Health Checking(this may not be necessary, but its how I have mine configured and is working) - Click
Save
- For
- Click on the
Virtual Servicestab drop down, then clickPublic Servicesand click on the+in the list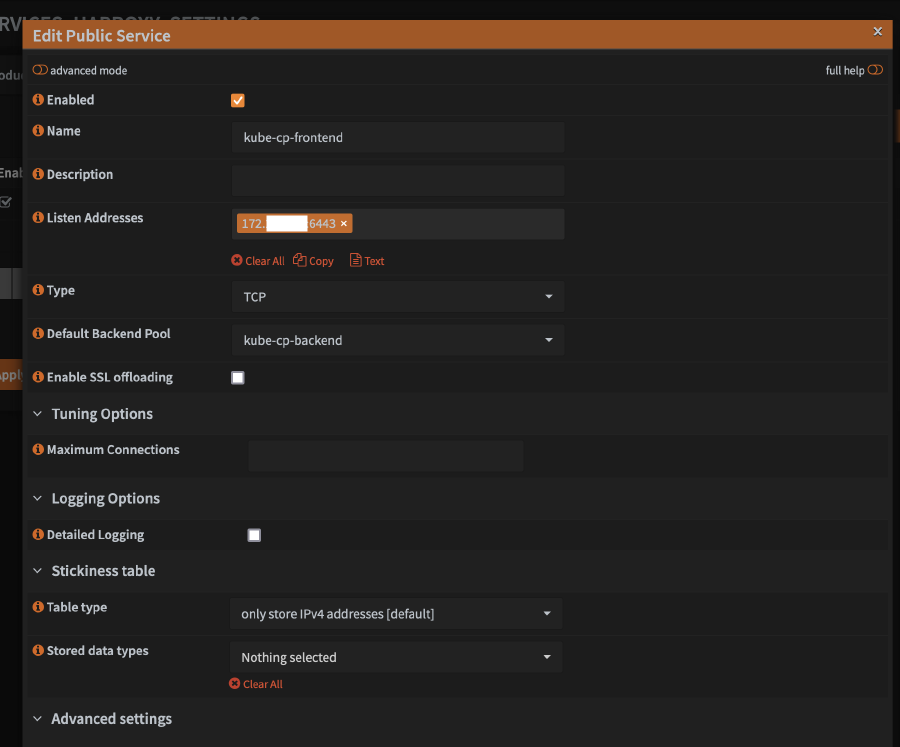
- For
Name, enterkube-cp-frontendor whatever name you want - Enter the address and port on which you want the load balancer to listen on the OPNsense router in the form of
<IP>:<PORT>, for example192.168.1.1:6443, assuming your router LAN ip address is192.168.1.1 - Set
TypetoTCP - For
Default Backend Pool, select the backend server pool you configured above - Under
Stickiness table, setTable typetoonly store IPv4 addresses - Click
Save
- For
- Click on the
Settingstab, then clickService - Check the box for
Enable HAProxy - Click
Save & Test Syntax - Assuming the syntax is OK, click
Apply


The final step is technically optional and will possibly be configured outside of OPNsense and is completely dependent on your LAN services. You should configure an internal DNS entry that points to the LAN ip address of your router, something dedicated for Kubernetes. This shouldn’t be technically required, however, because you can provide kubeadm with the internal IP address of your router below instead of a DNS name.
Bootstrap the new cluster
This step is only required on the first node because it is what creates the actual Kubernetes cluster. Subsequent nodes will be added to the cluster and require slightly different steps, which will be described below.
NOTE:

The IP ranges I use below are what I chose to use for my network. You do NOT have to use the same range, so feel free to select a new range but be sure to take note of the ranges you select as you will need them later when configuring BGP routing. If you chose your own range, it is critical that the new range does NOT fall within any existing range that your network utilizes. I personally use 172.x.x.x ranges for my LAN ranges, so I chose 10.x.x.x ranges for Kube's use.
Since this command is a little involved, I will outline what each option is used for prior to showing the full command. A few of the parameters can be skipped if you don’t need them in your environment.
--control-plane-endpoint "kubeadm.internal.example.com:6443"Required
FQDN or IP address of the load balancer configured on OPNsense--upload-certsRequired
Required when configuring multiple control plane nodes--pod-network-cidr=10.29.0.0/16
IP address range to use when assigning addresses to pods. This isn’t technically required because Kube will provide a default range, but BGP routing is easier to setup later if you alreay define and know the range here.--service-cidr=10.32.0.0/12
IP address range to use for services--apiserver-advertise-address=192.168.1.49
If the host you are configuring as a kube node has multiple IP addresses, this can help ensure that Kube selects the correct IP address to bind the API server to--service-dns-domain=kube.internal.example.com
DNS domain name to use when assigning domains to services
Run the following command to bootstrap the new cluster.
kubeadm init \
  --control-plane-endpoint "kubeadm.internal.example.com:6443" \
  --upload-certs \
  --pod-network-cidr=10.29.0.0/16 \
  --service-cidr=10.32.0.0/12 \
  --apiserver-advertise-address=192.168.1.49 \
  --service-dns-domain=kube.internal.example.com
This command will output a lot of useful information once it finishes running. SAVE IT! - you WILL need it later.
Example output:
Your Kubernetes control-plane has initialized successfully!

To start using your cluster, you need to run the following as a regular user:

  mkdir -p $HOME/.kube
  sudo cp -i /etc/kubernetes/admin.conf $HOME/.kube/config
  sudo chown $(id -u):$(id -g) $HOME/.kube/config

Alternatively, if you are the root user, you can run:

  export KUBECONFIG=/etc/kubernetes/admin.conf

You should now deploy a pod network to the cluster.
Run "kubectl apply -f [podnetwork].yaml" with one of the options listed at:
  https://kubernetes.io/docs/concepts/cluster-administration/addons/

You can now join any number of the control-plane node running the following command on each as root:

  kubeadm join kubeadm.internal.example.com:6443 --token xtuiiu.14dd7db013f44672 \
	--discovery-token-ca-cert-hash sha256:f22fad490b424613bed4e276b8e9d4f1e0ef0dd4744b48cbab9638b08da37971 \
	--control-plane --certificate-key 64680a7065e441dc8f458e9c04e006c9fddc177aac7248159f2b8a7f1f602764

Please note that the certificate-key gives access to cluster sensitive data, keep it secret!
As a safeguard, uploaded-certs will be deleted in two hours; If necessary, you can use
"kubeadm init phase upload-certs --upload-certs" to reload certs afterward.

Then you can join any number of worker nodes by running the following on each as root:

kubeadm join kubeadm.internal.example.com:6443 --token xtuiiu.wyyqjj7rgve65yd0 \
	--discovery-token-ca-cert-hash sha256:f22fad490b424613bed4e276b8e9d4f1e0ef0dd4744b48cbab9638b08da37971
The most important bit above is the part that says “You can now join any number of the control-plane node running the following command…” as it shows you the command you will need below to add an additional control plane to the cluster.
NOTE:

If you read the output above, it says the following:

Please note that the certificate-key gives access to cluster sensitive data, keep it secret!
As a safeguard, uploaded-certs will be deleted in two hours; If necessary, you can use
"kubeadm init phase upload-certs --upload-certs" to reload certs afterward.

Ideally, if you intend to add additional nodes, now is the best time to do it. You can do it later, but it requires extra steps.
Add additional control-plane nodes
For any additional nodes you desire to add, you will need to perform the following:
- Follow the steps outlined above to prep the node, just as you did for the first node
- Run the command that was output from the
kubeadm initcommand above on the new node, for example:
kubeadm join kubeadm.internal.example.com:6443 --token xtuiiu.14dd7db013f44672 \
	--discovery-token-ca-cert-hash sha256:f22fad490b424613bed4e276b8e9d4f1e0ef0dd4744b48cbab9638b08da37971 \
	--control-plane --certificate-key 64680a7065e441dc8f458e9c04e006c9fddc177aac7248159f2b8a7f1f602764
- Don’t forget to add all control plane nodes to the OPNsense load balancer so that requests are truly load balancer. In OPNsense you will need to add eah control plane to the “Real Servers” tab of the HAproxy config, and be sure to modify the backend service to include the real servers as part of the pool.
Add worker nodes
If you plan to build out a cluster larger than what I am (3x systems only, you will likely not want to make ALL of the systems operate as control planes. In order to add one or more worker nodes, the following steps apply.
- Follow the steps outlined above to prep the node, just as you did for the first node
- Run the command that was output from the
kubeadm initcommand above on the new node, for example:
kubeadm join kubeadm.internal.example.com:6443 --token xtuiiu.wyyqjj7rgve65yd0 \
	--discovery-token-ca-cert-hash sha256:f22fad490b424613bed4e276b8e9d4f1e0ef0dd4744b48cbab9638b08da37971
Finishing up
Once you have created your cluster, you will use kubectl to interact with and manage it. Access to the kube cluster, by default, is granted with a file that was created on the first control plane node when you initalized the cluster. If you only intend to manage Kubernetes from the first control plane, then you just need to set the KUBECONFIG environment variable in the shell to point to the file:
export KUBECONFIG="/etc/kubernetes/admin.conf"
As this file can only be read by the root user, it would need to be copied and ownership changed if you intend to access kube from a non-root user. You can also add this line to your shell profile so that the environment variable is set at login, but I will leave that as an excercise for you to figure out on your own. :)
WARNING:

The file located at /etc/kubernetes/admin.conf is essentially a root key for the entire kubernetes cluster. You MUST protect this file and ensure that it isn't readable by non-privileged users. Someone on your network with that file has 100% access to your kube cluster. You've been warned.
The next step is optional if you chose to build a cluster that contains proper worker nodes. I did not choose to build such a cluster, so this is the process I had to follow.
A bit of info for you here is that Kubernetes, by default, will not schedule pods on control plane nodes. This is done to ensure stability of the control plane nodes themselves. This is controlled by a taint that is placed on all control planes.
In order for pods to be scheduled on control planes, you have to remove the taint. Thankfully, this is simple:
export KUBECONFIG="/etc/kubernetes/admin.conf"
kubectl taint nodes --all node-role.kubernetes.io/control-plane-
Summary
At this point, I have a running Kubernetes cluster with one or more control plane and/or worker nodes.
In the next article, I will be setting up the network provider (CNI) and configuring OPNsense for BGP routing.