
Introduction
In the previous article, I prepared my nodes, created the new kube cluster and added all my nodes to the cluster.
This article will outline the process that I followed to setup Calico, the network provider, known in Kubernetes land as “Container Network Interface”.
Credits
So I want to first start off by saying that this portion was largely possible for me thanks to an excellent article by tizbit . The only reason I am writing my own article about it is because I want to make sure and cover the Calico installation process prior to setting up the BGP routing.
Overview
When you are configuring the CNI for Kubernetes, you will need to define a few IP ranges. In part 2 we defined two of those network ranges already, the pod network CIDR block and the service CIDR block. Additionally, we need to define service external CIDR block and load balancer CIDR block. I have chosen the following CIDR blocks, feel free to change them but make sure you take note of the ranges you choose as you will need them below.
| Use | CIDR |
|---|---|
| Pod network | 10.29.0.0/16 |
| Service - External | 10.30.0.0/16 |
| Service - Load Balancer | 10.31.0.0/16 |
| Service - Cluster | 10.32.0.0/12 |
Install the Calico CNI
The installation process is pretty well outlined here but I will sum up the steps here too, just to be thorough.
- First you need to install the Calico operator, which apparently does all the heavy lifting automatically. Don’t ask me to fully explain what all it does as I haven’t read too deep into it yet.
kubectl create -f https://raw.githubusercontent.com/projectcalico/calico/v3.28.0/manifests/tigera-operator.yaml
- Download a copy of the custome resources needed to configure Calico.
curl https://raw.githubusercontent.com/projectcalico/calico/v3.28.0/manifests/custom-resources.yaml -O
- Using your favorite text edit (I suggest
vim), editcustom-resources.yaml. You need to editcidrunder the firstspec.calicoNetwork.ipPoolsentry so that it matches the “Pod network” selected above, in my case10.29.0.0/16. This is how my file looks. You can likely use it as-is, but its probably better to pull a fresh copy using step 2 and edit, in case the default changes from Calico.
# This section includes base Calico installation configuration.
# For more information, see: https://docs.tigera.io/calico/latest/reference/installation/api#operator.tigera.io/v1.Installation
apiVersion: operator.tigera.io/v1
kind: Installation
metadata:
  name: default
spec:
  # Configures Calico networking.
  calicoNetwork:
    ipPools:
    - name: default-ipv4-ippool
      blockSize: 26
      cidr: 10.29.0.0/16
      encapsulation: VXLANCrossSubnet
      natOutgoing: Enabled
      nodeSelector: all()

---

# This section configures the Calico API server.
# For more information, see: https://docs.tigera.io/calico/latest/reference/installation/api#operator.tigera.io/v1.APIServer
apiVersion: operator.tigera.io/v1
kind: APIServer
metadata:
  name: default
spec: {}
- Create the Calico configuration
kubectl create -f custom-resources.yaml
- Wait for Calico to fully start up
watch kubectl get pods -n calico-system
You should see something simmilar to this:
NAME                                       READY   STATUS    RESTARTS       AGE
calico-kube-controllers-7f7795754c-qq9px   1/1     Running   1 (42h ago)    7d22h
calico-node-t66tp                          1/1     Running   1 (42h ago)    7d22h
calico-typha-7b598d75c9-8rtdd              1/1     Running   1 (42h ago)    7d22h
csi-node-driver-7bchz                      2/2     Running   60 (37h ago)   7d22h
Once all pods are running, hit Ctrl+C to stop the watch command.
Configure BGP routing
Calico configuration
I highly recommend you take a few minutes to read through
tizbit’s article so that you can get an explanation of the asNumber field below. I don’t want to go into it here, but its useful information to know.
- Certain calico configuration must be done with the
calicoctltool. Install it first, as root (or use sudo)
cd /usr/local/sbin
curl -L https://github.com/projectcalico/calico/releases/download/v3.28.0/calicoctl-linux-amd64 -o calicoctl
chmod +x ./calicoctl
- Create a
calico-bgp-config.yamlfile with the following contents. Be sure to edit thespec.peerIPtoward the bottom to the internal IP address of the OPNsense router. Also, be sure to edit the three provided CIDR blocks if you chose a different set than I do.
apiVersion: projectcalico.org/v3
kind: BGPConfiguration
metadata:
  name: default
spec:
  asNumber: 64513
  nodeToNodeMeshEnabled: true
  serviceExternalIPs:
    - cidr: 10.30.0.0/16
  serviceLoadBalancerIPs:
    - cidr: 10.31.0.0/16
  serviceClusterIPs:
    - cidr: 10.32.0.0/12
---
apiVersion: projectcalico.org/v3
kind: BGPPeer
metadata:
  name: router
spec:
  peerIP: 192.168.1.1
  asNumber: 64512
  keepOriginalNextHop: true
  maxRestartTime: 15m
---
- Apply the configuration using
calicoctl
calicoctl apply -f calico-bgp-config.yaml
OPNsense configuration
- Login to the OPNsense admin panel
- Navigate to
System > Firmware > Pluginsand install theos-frrplugin. NOTE: You may be required to first upgrade and reboot the router as described in part 2 of this series. - After the plugin installation is complete, refresh your browser window (Ctrl+R or Command+R, typically).
- Navigate to
Routing > BGP - I prefer to start on the
Neighborstab. You will need to repeat this step for every node in your cluster. - Add a new neighbor by clicking the
+icon at the bottom right of the table.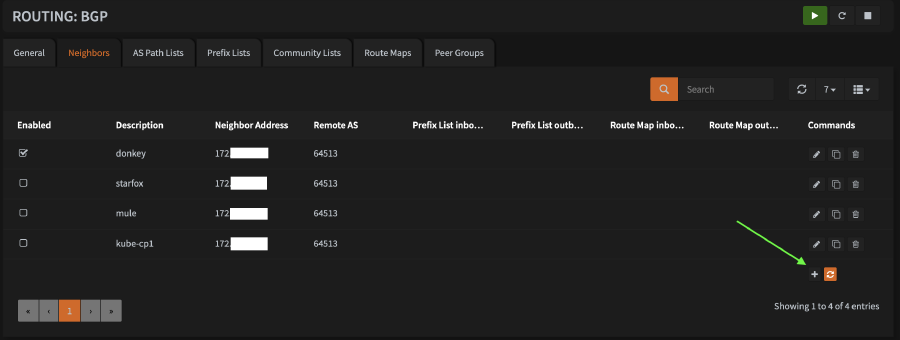
- Configure the new host as follows:
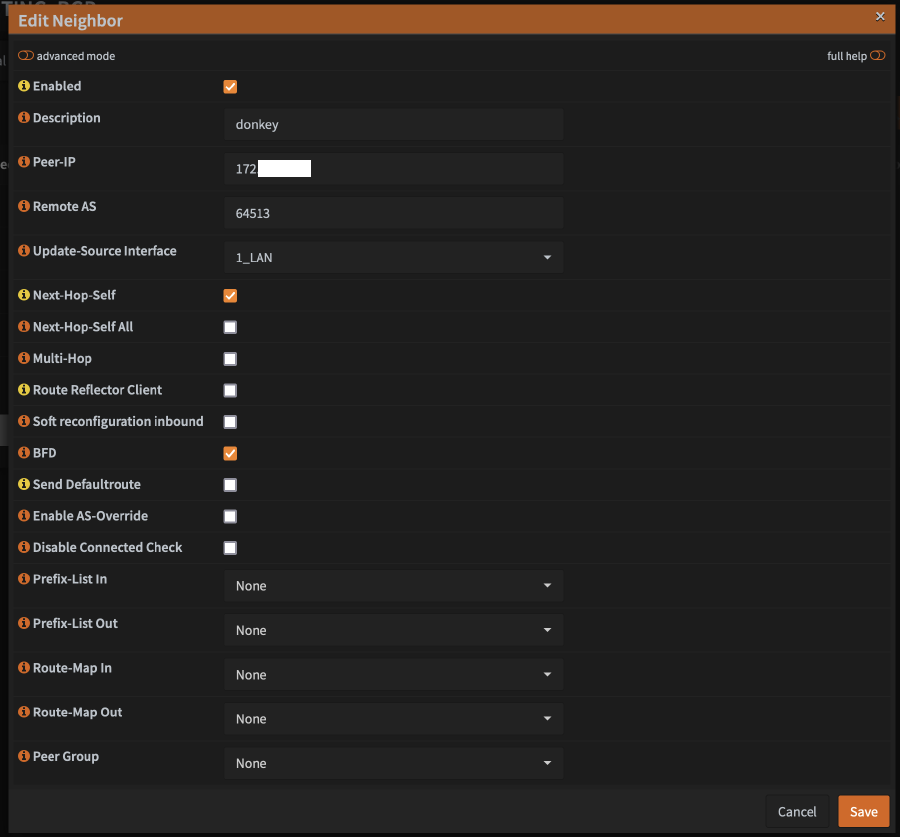


- In the
Descriptionfield, enter the node’s hostname - In the
Peer-IPfield, enter the LAN ip of the node - In the
RemoteASfield, enter64513(or whatever number you chose, if not using the one I am using) - For
Update-Source Interface, select the OPNsense interface that should be used to communicate with the Kube node (probably justLANfor most people) - Check the boxes for
Next-Hop-SelfandBFD - Click
Save - Repeat for every node in your cluster
- On the general page, configure the following:


- Check the box for
enable - For
BGP AS Number, enter64512 - Enter every non-kube CIDR that you want routable to the kube subnets. For most people, this will likely just be
192.168.1.0/24 - I prefer to check
Log Neighbor Changesfor debugging purposes, but I don’t believe its required. - Ensure that
Route Distributionis set toConnected routes (directly attached subnet or host) - Click
Save
- Navigate to
Routing > Generaland configure: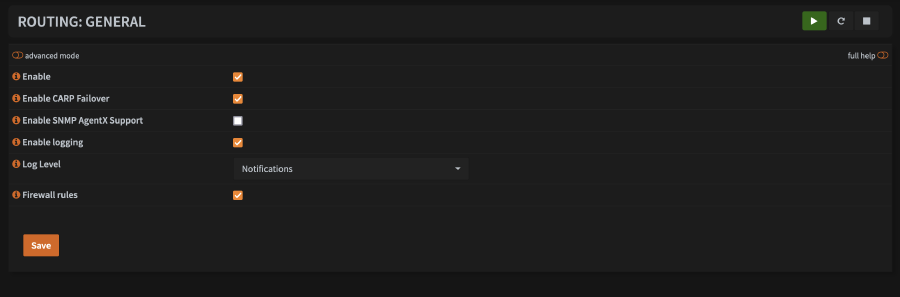

- Check
Enable - If you are using CARP, check
Enable CARP Failover- if you don’t know what CARP is, you don’t need to check the box - I prefer to check
Enable Logging, but not required - Check
Firewall rules, unless you have a specific reason not to - Click
Save
Testing
At this point, you should have all the pieces in place for BGP routing with OPNsense and Calico on your Kubernetes cluster. Lets test a few things to see if its working.
- First, lets check the connection status on the Kubernetes side using
calicoctl.
calicoctl node status
If its connected, you should see something like this:
Calico process is running.

IPv4 BGP status
+--------------+-----------+-------+------------+-------------+
| PEER ADDRESS | PEER TYPE | STATE |   SINCE    |    INFO     |
+--------------+-----------+-------+------------+-------------+
| 192.168.1.1  | global    | up    | 2024-07-26 | Established |
+--------------+-----------+-------+------------+-------------+

IPv6 BGP status
No IPv6 peers found.
Now for good measure, lets check it on the OPNsense side. Navigate to
Routing > Diagnostics > BGP. Under theIPv4 Routing Tabletab, you should see all of your Kubernetes CIDR blocks listed. Under theNeighborstab, you should see each BGP peer listed by their LAN IP address.And finally, lets test traffic from outside the cluster to a pod. An easy way to do this is to get the IP of one of the running
corednspods and ping it from a system that is NOT a kube node.
- To find the ip, run this command and look for one of the pods that start with
coredns-
kubectl get pods -n kube-system -o wide
Example output:
NAME                                  READY   STATUS    RESTARTS        AGE   IP             NODE     NOMINATED NODE   READINESS GATES
coredns-7db6d8ff4d-45srn              1/1     Running   1 (2d15h ago)   8d    10.29.251.16   donkey   <none>           <none>
coredns-7db6d8ff4d-m2thc              1/1     Running   1 (2d15h ago)   8d    10.29.251.14   donkey   <none>           <none>
Copy the IP and attempt to ping it from another system on your lan. You should see a successful response:
(.venv) [flip@armbook ~]$ ping 10.29.251.16
PING 10.29.251.16 (10.29.251.16): 56 data bytes
64 bytes from 10.29.251.16: icmp_seq=0 ttl=63 time=5.233 ms
64 bytes from 10.29.251.16: icmp_seq=1 ttl=63 time=5.536 ms
Summary
At this point, I have a running Kubernetes cluster with one or more control planes and/or worker nodes and a functioning network, with BGP routing provided by OPNsense and the Calico CNI.
In the next article, I will be setting up the load balancer via MetalLB.